
Monday, January 1, 2024
demo blog / fonts: DM Mono, Freight Display Pro / colours: Shadow #887547, Tan #D0AB8F
Theme Installation
BEFORE YOU START INSTALLING THE TEMPLATE, READ THIS FILE.
The installation process is very easy and by following this guide, you can have it done within a couple of minutes. Make sure you read all instructions correctly to avoid any mistakes.
Creating a backup of your current theme
Before you start installing your theme, create a backup of your current theme in case an error occurs or you need to restore some data. You can also test the template on a test blog, rearrange the widgets or personalize it before installing it to your blog.
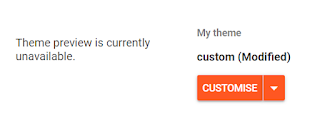
- Go to Theme.
- Click on the arrow next to "Customize".
- Select "Backup".
Installing the theme
Your theme will be installed by a few clicks. After installation, you old gadgets will be kept and need to be rearranged or deleted. You can also have the demo blog open in a new tab on your browser to easily mimic it.
- Download the file you received, open the zip and extract the files inside.
- Go to Theme, click on the arrow next to customize and select "Restore".
- Locate the Alyssum.xml file on your device and upload it.
Theme responsiveness
To make the theme responsive on all devices, you need to check or edit the settings for your blog.
- In Theme, click on the arrow next to "Customize".
- Select “Mobile Settings”.
- Check “Desktop” and save the changes.
Theme Basics
Firsty, edit the basic elements on your website. This includes the header and adding your custom logo, adding your social media links and setting up the top menu or the navigation panel. If you wish to customize the colours in the theme (which you can easily do so), you will learn how to do this in here as well.
Widget Configuration
We recommend not removing any widgets yourself. If there is a widget which you do not plan on using, you can contact us and we can remove it for you. Please also be careful when setting up the template so you do not accidentally remove a widget — some widgets contain custom HTML code and when you try to add it again, it may not look the same. In this case, please reach out to us.
Need more help?
If you run into any issues while installing your new template, you can head over to our Troubleshooting page. However, if you have not found the answer to your problem, feel free to contact us!

demo blog / fonts: DM Mono, Karla / colours: Pearl Bush #EFE9E0, Indian Khaki #C1B198
Theme Installation
BEFORE YOU START INSTALLING THE TEMPLATE, READ THIS FILE.
The installation process is very easy and by following this guide, you can have it done within a couple of minutes. Make sure you read all instructions correctly to avoid any mistakes.
Creating a backup of your current theme
Before you start installing your theme, create a backup of your current theme in case an error occurs or you need to restore some data. You can also test the template on a test blog, rearrange the widgets or personalize it before installing it to your blog.
- Go to Theme.
- Click on the arrow next to "Customize".
- Select "Backup".
Installing the theme
Your theme will be installed by a few clicks. After installation, you old gadgets will be kept and need to be rearranged or deleted. You can also have the demo blog open in a new tab on your browser to easily mimic it.
- Download the file you received, open the zip and extract the files inside.
- Go to Theme, click on the arrow next to customize and select "Restore".
- Locate the Sunflower.xml file on your device and upload it.
Theme responsiveness
To make the theme responsive on all devices, you need to check or edit the settings for your blog.
- In Theme, click on the arrow next to "Customize".
- Select “Mobile Settings”.
- Check “Desktop” and save the changes.
Theme Basics
Firsty, edit the basic elements on your website. This includes the header and adding your custom logo, adding your social media links and setting up the top menu or the navigation panel. If you wish to customize the colours in the theme (which you can easily do so), you will learn how to do this in here as well.
Widget Configuration
We recommend not removing any widgets yourself. If there is a widget which you do not plan on using, you can contact us and we can remove it for you. Please also be careful when setting up the template so you do not accidentally remove a widget — some widgets contain custom HTML code and when you try to add it again, it may not look the same. In this case, please reach out to us.
Need more help?
If you run into any issues while installing your new template, you can head over to our Troubleshooting page. However, if you have not found the answer to your problem, feel free to contact us!

demo blog / fonts: Libre Carlson Display, Work Sans / colours: Quill Grey #D3D2D1, Bombay #A9A9AB
Theme Installation
BEFORE YOU START INSTALLING THE TEMPLATE, READ THIS FILE.
The installation process is very easy and by following this guide, you can have it done within a couple of minutes. Make sure you read all instructions correctly to avoid any mistakes.
Creating a backup of your current theme
Before you start installing your theme, create a backup of your current theme in case an error occurs or you need to restore some data. You can also test the template on a test blog, rearrange the widgets or personalize it before installing it to your blog.
- Go to Theme.
- Click on the arrow next to "Customize".
- Select "Backup".
Installing the theme
Your theme will be installed by a few clicks. After installation, you old gadgets will be kept and need to be rearranged or deleted. You can also have the demo blog open in a new tab on your browser to easily mimic it.
- Download the file you received, open the zip and extract the files inside.
- Go to Theme, click on the arrow next to customize and select "Restore".
- Locate the Magnolia.xml file on your device and upload it.
Theme responsiveness
To make the theme responsive on all devices, you need to check or edit the settings for your blog.
- In Theme, click on the arrow next to "Customize".
- Select “Mobile Settings”.
- Check “Desktop” and save the changes.
Theme Basics
Firsty, edit the basic elements on your website. This includes the header and adding your custom logo, adding your social media links and setting up the top menu or the navigation panel. If you wish to customize the colours in the theme (which you can easily do so), you will learn how to do this in here as well.
Widget Configuration
We recommend not removing any widgets yourself. If there is a widget which you do not plan on using, you can contact us and we can remove it for you. Please also be careful when setting up the template so you do not accidentally remove a widget — some widgets contain custom HTML code and when you try to add it again, it may not look the same. In this case, please reach out to us.
Need more help?
If you run into any issues while installing your new template, you can head over to our Troubleshooting page. However, if you have not found the answer to your problem, feel free to contact us!

demo blog / fonts: Bodoni Moda, Didact Gothic / colours: Pearl Bush #E5D7C4, Cape Palliser #916B46
Theme Installation
BEFORE YOU START INSTALLING THE TEMPLATE, READ THIS FILE.
The installation process is very easy and by following this guide, you can have it done within a couple of minutes. Make sure you read all instructions correctly to avoid any mistakes.
Creating a backup of your current theme
Before you start installing your theme, create a backup of your current theme in case an error occurs or you need to restore some data. You can also test the template on a test blog, rearrange the widgets or personalize it before installing it to your blog.
- Go to Theme.
- Click on the arrow next to "Customize".
- Select "Backup".
Installing the theme
Your theme will be installed by a few clicks. After installation, you old gadgets will be kept and need to be rearranged or deleted. You can also have the demo blog open in a new tab on your browser to easily mimic it.
- Download the file you received, open the zip and extract the files inside.
- Go to Theme, click on the arrow next to customize and select "Restore".
- Locate the Alchemilla.xml file on your device and upload it.
Theme responsiveness
To make the theme responsive on all devices, you need to check or edit the settings for your blog.
- In Theme, click on the arrow next to "Customize".
- Select “Mobile Settings”.
- Check “Desktop” and save the changes.
Theme Basics
Firsty, edit the basic elements on your website. This includes the header and adding your custom logo, adding your social media links and setting up the top menu or the navigation panel. If you wish to customize the colours in the theme (which you can easily do so), you will learn how to do this in here as well.
Widget Configuration
We recommend not removing any widgets yourself. If there is a widget which you do not plan on using, you can contact us and we can remove it for you. Please also be careful when setting up the template so you do not accidentally remove a widget — some widgets contain custom HTML code and when you try to add it again, it may not look the same. In this case, please reach out to us.
Need more help?
If you run into any issues while installing your new template, you can head over to our Troubleshooting page. However, if you have not found the answer to your problem, feel free to contact us!

demo blog / fonts: Old Standard TT, DM Sans / colours: Westar #E3DBD5, Cloudy #B0ACA8
Theme Installation
BEFORE YOU START INSTALLING THE TEMPLATE, READ THIS FILE.
The installation process is very easy and by following this guide, you can have it done within a couple of minutes. Make sure you read all instructions correctly to avoid any mistakes.
Creating a backup of your current theme
Before you start installing your theme, create a backup of your current theme in case an error occurs or you need to restore some data. You can also test the template on a test blog, rearrange the widgets or personalize it before installing it to your blog.
- Go to Theme.
- Click on the arrow next to "Customize".
- Select "Backup".
Installing the theme
Your theme will be installed by a few clicks. After installation, you old gadgets will be kept and need to be rearranged or deleted. You can also have the demo blog open in a new tab on your browser to easily mimic it.
- Download the file you received, open the zip and extract the files inside.
- Go to Theme, click on the arrow next to customize and select "Restore".
- Locate the Tulip.xml file on your device and upload it.
Theme responsiveness
To make the theme responsive on all devices, you need to check or edit the settings for your blog.
- In Theme, click on the arrow next to "Customize".
- Select “Mobile Settings”.
- Check “Desktop” and save the changes.
Theme Basics
Firsty, edit the basic elements on your website. This includes the header and adding your custom logo, adding your social media links and setting up the top menu or the navigation panel. If you wish to customize the colours in the theme (which you can easily do so), you will learn how to do this in here as well.
Widget Configuration
We recommend not removing any widgets yourself. If there is a widget which you do not plan on using, you can contact us and we can remove it for you. Please also be careful when setting up the template so you do not accidentally remove a widget — some widgets contain custom HTML code and when you try to add it again, it may not look the same. In this case, please reach out to us.
Need more help?
If you run into any issues while installing your new template, you can head over to our Troubleshooting page. However, if you have not found the answer to your problem, feel free to contact us!

demo blog / fonts: Old Standard TT, DM Sans / colours: Rodeo Dust #CDB59B, Leather #937054
Theme Installation
BEFORE YOU START INSTALLING THE TEMPLATE, READ THIS FILE.
The installation process is very easy and by following this guide, you can have it done within a couple of minutes. Make sure you read all instructions correctly to avoid any mistakes.
Creating a backup of your current theme
Before you start installing your theme, create a backup of your current theme in case an error occurs or you need to restore some data. You can also test the template on a test blog, rearrange the widgets or personalize it before installing it to your blog.
- Go to Theme.
- Click on the arrow next to "Customize".
- Select "Backup".
Installing the theme
Your theme will be installed by a few clicks. After installation, you old gadgets will be kept and need to be rearranged or deleted. You can also have the demo blog open in a new tab on your browser to easily mimic it.
- Download the file you received, open the zip and extract the files inside.
- Go to Theme, click on the arrow next to customize and select "Restore".
- Locate the Dahlia.xml file on your device and upload it.
Theme responsiveness
To make the theme responsive on all devices, you need to check or edit the settings for your blog.
- In Theme, click on the arrow next to "Customize".
- Select “Mobile Settings”.
- Check “Desktop” and save the changes.
Theme Basics
Firsty, edit the basic elements on your website. This includes the header and adding your custom logo, adding your social media links and setting up the top menu or the navigation panel. If you wish to customize the colours in the theme (which you can easily do so), you will learn how to do this in here as well.
Widget Configuration
We recommend not removing any widgets yourself. If there is a widget which you do not plan on using, you can contact us and we can remove it for you. Please also be careful when setting up the template so you do not accidentally remove a widget — some widgets contain custom HTML code and when you try to add it again, it may not look the same. In this case, please reach out to us.
Need more help?
If you run into any issues while installing your new template, you can head over to our Troubleshooting page. However, if you have not found the answer to your problem, feel free to contact us!

demo blog / fonts: Playfair Display, Pavanam / colours: Sorrell Brown #D0AB8F, Akaroa #D2C2A1
Theme Installation
BEFORE YOU START INSTALLING THE TEMPLATE, READ THIS FILE.
The installation process is very easy and by following this guide, you can have it done within a couple of minutes. Make sure you read all instructions correctly to avoid any mistakes.
Creating a backup of your current theme
Before you start installing your theme, create a backup of your current theme in case an error occurs or you need to restore some data. You can also test the template on a test blog, rearrange the widgets or personalize it before installing it to your blog.
- Go to Theme.
- Click on the arrow next to "Customize".
- Select "Backup".
Installing the theme
Your theme will be installed by a few clicks. After installation, you old gadgets will be kept and need to be rearranged or deleted. You can also have the demo blog open in a new tab on your browser to easily mimic it.
- Download the file you received, open the zip and extract the files inside.
- Go to Theme, click on the arrow next to customize and select "Restore".
- Locate the Nettle.xml file on your device and upload it.
Theme responsiveness
To make the theme responsive on all devices, you need to check or edit the settings for your blog.
- In Theme, click on the arrow next to "Customize".
- Select “Mobile Settings”.
- Check “Desktop” and save the changes.
Theme Basics
Firsty, edit the basic elements on your website. This includes the header and adding your custom logo, adding your social media links and setting up the top menu or the navigation panel. If you wish to customize the colours in the theme (which you can easily do so), you will learn how to do this in here as well.
Widget Configuration
We recommend not removing any widgets yourself. If there is a widget which you do not plan on using, you can contact us and we can remove it for you. Please also be careful when setting up the template so you do not accidentally remove a widget — some widgets contain custom HTML code and when you try to add it again, it may not look the same. In this case, please reach out to us.
Need more help?
If you run into any issues while installing your new template, you can head over to our Troubleshooting page. However, if you have not found the answer to your problem, feel free to contact us!

demo blog / fonts: Bodoni Moda, Karla / colours: Spring Wood #FDFCFB, Bone #DDD3B8
Theme Installation
BEFORE YOU START INSTALLING THE TEMPLATE, READ THIS FILE.
The installation process is very easy and by following this guide, you can have it done within a couple of minutes. Make sure you read all instructions correctly to avoid any mistakes.
Creating a backup of your current theme
Before you start installing your theme, create a backup of your current theme in case an error occurs or you need to restore some data. You can also test the template on a test blog, rearrange the widgets or personalize it before installing it to your blog.
- Go to Theme.
- Click on the arrow next to "Customize".
- Select "Backup".
Installing the theme
Your theme will be installed by a few clicks. After installation, you old gadgets will be kept and need to be rearranged or deleted. You can also have the demo blog open in a new tab on your browser to easily mimic it.
- Download the file you received, open the zip and extract the files inside.
- Go to Theme, click on the arrow next to customize and select "Restore".
- Locate the Heather.xml file on your device and upload it.
Theme responsiveness
To make the theme responsive on all devices, you need to check or edit the settings for your blog.
- In Theme, click on the arrow next to "Customize".
- Select “Mobile Settings”.
- Check “Desktop” and save the changes.
Theme Basics
Firsty, edit the basic elements on your website. This includes the header and adding your custom logo, adding your social media links and setting up the top menu or the navigation panel. If you wish to customize the colours in the theme (which you can easily do so), you will learn how to do this in here as well.
Widget Configuration
We recommend not removing any widgets yourself. If there is a widget which you do not plan on using, you can contact us and we can remove it for you. Please also be careful when setting up the template so you do not accidentally remove a widget — some widgets contain custom HTML code and when you try to add it again, it may not look the same. In this case, please reach out to us.
Need more help?
If you run into any issues while installing your new template, you can head over to our Troubleshooting page. However, if you have not found the answer to your problem, feel free to contact us!
Subscribe to:
Posts (Atom)
Social Media